Eggnog Cupcakes

Eggnog is a classic Christmas flavour. And even though I’m not a fan of eggnog itself, I am a huge fan of eggnog flavoured baking! Last year, I decided to make eggnog shortbread to include in my Christmas baking gift baskets. However, the cookies did not make it into the baskets the week of Christmas. They were too difficult to resist and were all eaten within a day or two of being baked. Mmmm!

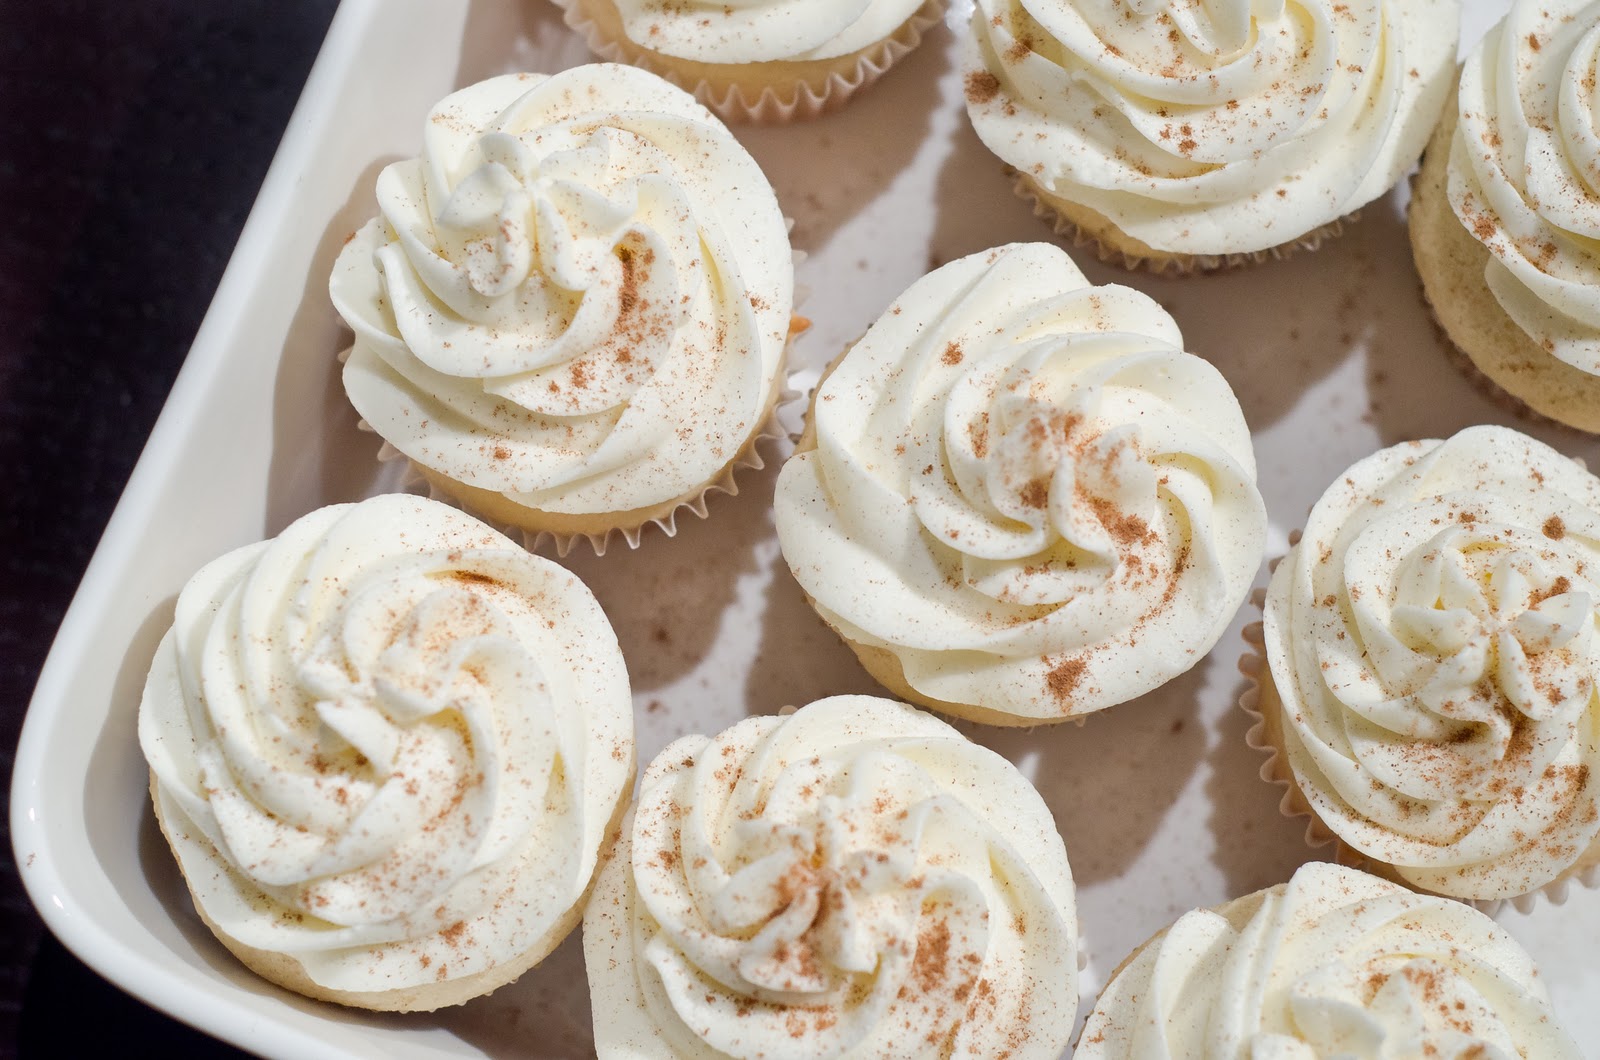
After success with the eggnog shortbread, I was excited to try an eggnog-related baking item again this year. After I saw this recipe on my favourite blog Annie’s Eats (and because I adore making cupcakes), I decided that this year I would make eggnog cupcakes. I made a batch this past week and brought them into work for our Christmas lunch. The cake itself is really nice, but the best part is definitely the icing. It is delicious. It has the nicest eggnog flavour and looks so pretty with the little flecks of ground nutmeg.

These eggnog cupcakes are the perfect dessert to bring to a holiday party this season. They are really easy to put together and provide a nice unique contrast to all the other Christmas sweets on the dessert table.

Cupcake Ingredients
  • 1 and 1/3 cups of all-purpose flour
  • 1/4 teaspoon of baking soda
  • 1/2 teaspoon of baking powder
  • 1/2 teaspoon of salt
  • 1/4 teaspoon of ground nutmeg
  • 1/4 cup of dark rum or bourbon (optional)
  • 1 cup of eggnog
  • 1/4 cup of canola or vegetable oil
  • 1 tablespoon of apple cider vinegar
  • 1 teaspoon of vanilla extract
  • 1 cup of granulated white sugar

Frosting Ingredients
  • 20 tablespoons of unsalted butter; at room temperature
  • 2 and 1/2 cups of confectioner’s sugar; sifted
  • pinch of salt
  • 2 and 1/2 tablespoons of eggnog
  • 1 tablespoon of dark rum (optional)

Garnish: ground cinnamon or grated nutmeg

Method

1. To make the cupcakes, preheat the oven to 350’F. Line cupcake pans with paper liners. In a medium bowl, combine the flour, baking soda, baking powder, salt and nutmeg. Whisk to combine. In a large bowl, combine the rum, eggnog, oil, vinegar and sugar with an electric mixer. Beat on medium-low speed until well blended. Add the dry ingredients and mix on a low speed just until incorporated.

2. Divide the batter between the prepared cupcakes liners, filling the cups 2/3 full. Bake 22 to 24 minutes, or until a toothpick inserted in the centre comes out clean (with a dry crumb). Allow to cool in the pan 5 minutes, then transfer to a wire rack to cool completely.

3. To make the frosting, place the butter in the bowl of an electric mixer fitted with the whisk attachment. Beat on medium-high speed until smooth, 20 to 30 seconds. Add in the powdered sugar, salt and nutmeg, and mix on medium-high speed until incorporated and smooth (about 1 minute). Scrape down the sides of the bowl. Add in the eggnog and whip on medium-high speed until light and fluffy (about 4 minutes). With the mixer on medium-low, blend in the rum.

4. Fill a pastry bag with the frosting and decorate the cooled cupcakes as desired. Sprinkle with ground cinnamon or grated nutmeg.

Source: Annie’s Eats

Mini Peppermint Oreo Cheesecakes

Wow, I cannot believe that we are only 2 weeks until Christmas Eve! December has flown by, and I’ve fallen behind on my Christmas baking! *hah* There have been so many other Christmas related things to do such as shopping, parties and Christmas movie watching! Oh man….Elf always makes me giggle. Normally, I have my tree up by December 1st, but that’s been put on hold as well. My focus this weekend will be to decorate the condo, put up the tree and catch up on some baking. I hope to make some gingerbread cookies and possibly some chocolate raspberry linzer cookies. How’s your Christmas baking coming along?

This week I organized my work Christmas lunch. We had our lunch at a fantastic restaurant in town called Pizzeria Gusto. The food was delicious!!! The best pizza crust in town by far. As a treat for everyone on my team, I made these mini cheesecakes and eggnog cupcakes (recipe to be posted on Sunday) for dessert. The mini cheesecakes were definitely the winning treat of the day. I was asked to share my recipe immediately by a few co-workers…so here we go! :) Hope you get the chance to enjoy these creamy & delicious minty mini cheesecakes this Christmas season.

Oh! And before I forget…please be sure to enter The Fig Tree‘s first giveaway (in honour of the Christmas season). Simply check out my post Merry Christmas with Music from Meaghan Smith & leave a comment about your favourite Christmas song. Draw will be on Wednesday, December 14th. Be sure to check back for the winner! :)
Ingredients
  • 42 cream-filled chocolate sandwich cookies (such as Oreos)
  • 2 pounds of cream cheese; at room temperature
  • 1 cup of granulated white sugar
  • 1 teaspoon of peppermint extract
  • 4 large eggs; at room temperature
  • 1 cup of sour cream
  • pinch of salt
  • garnish: peppermint chocolate christmas bark

Note: makes 30 mini cheesecakes

Peppermint chocolate christmas bark recipe to be posted this week!

Method

1. Preheat oven to 275’F. Line standard muffin tins with paper liners. Place 1 whole cookie in the bottom of each cup.

2. Chop the remaining cookies coarsely and set aside.

3. With an electric mixer on medium-high speed, beat the cream cheese until smooth. Make sure the scrape the sides of the bowl down frequently to prevent lumps. Gradually add the sugar; beat until well combined. Beat in the peppermint extract.

4. Combine the eggs in a small bowl. Drizzle the eggs into the cream cheese mixture a bit a a time, beating to combine. Scrape sides of bowl as needed. Beat in the sour cream and pinch of salt. 

5. Stir in the chopped cookies by hand.

6. Divide the batter evenly among the cookie-filled cups, filling each almost to the top. Bake, rotating tins halfway through, until filling is set (about 22 minutes). The cheesecakes will be firm, but still jiggly. 

7. Transfer tins to wire racks to cool completely. Refrigerate in tins at least 4 hours (or overnight) to allow the mini cheesecakes to set. Note: cheesecake is a form of custard and needs this time in the fridge to firm up, but stay creamy in the middle. Remove the cheesecakes from the tins right before serving. Garnish as desired. Peppermint bark worked really nicely with these mini cheesecakes.

Source: based on a recipe by Martha Stewart

Guest Post: Aunt Jessie’s Fruitcake

I love hearing about Christmas baking traditions. Some are very similar to my family’s traditions & some are very different. Every year, my mom, sister and I make Eatons gingerbread cookies and shortbread cookies. My mom also makes an incredible poppycock (caramel corn) recipe each year the week before Christmas. I look forward to my batch even more than I look forward to Christmas morning! I’ll be posting her fabulous recipe in a few weeks. In addition, I’ll be posting some new recipes that may become tradition in my family. It’s always fun to discover new favourites, as much as it’s fun to make the classics year-to-year.

Today, I’m excited to share a guest post by my friend Julia. I asked her to share one of her family traditions with The Fig Tree. She chose to share her Aunt Jessie’s fruitcake recipe. Now, I’ve never had any fruitcake before…because of the classic holiday stigma associated with fruit cake. The only fruit cake we had in our house growing up was once used to prop open a door! *hah* But Julia just delivered me a piece of fruitcake to try and I’m very excited to have it with my tea tonight. It looks and smells delicious! Plus, it’s so fresh and moist – very much unlike the fruitcake we had at home when I was a kid. So, without further ado, here is Julia’s wonderful guest post about her family’s fruitcake recipe.

Aunt Jessie’s Fruitcake Recipe by Julia Derksen

Making fruitcake is an annual tradition in my family and I’m pleased to be able to share our recipe with you as a guest on The Fig Tree. I know that fruitcake may have a bad rep, but I feel that it is totally undeserved. Sure, there are bad fruitcakes out there, but fruitcake done right is amazing. Just look at the list of ingredients – what’s not to love? Sweet glace fruit mixed in just enough citrus cake batter to hold them together? Yes please! So please reserve your judgment until you have tasted my family’s fruitcake recipe and I promise you won’t be disappointed! This is the recipe that I follow because we are big fruitcake eaters and it makes a LOT. You can easily cut this recipe down to
the size you require.

Ingredients
  • 2 c. sugar
  • 1 lb salted butter, softened
  • 1 dozen eggs
  • 6 c. flour
  • 3 tsp baking powder
  • 1 tsp salt
  • 1 c. orange juice
  • 2 lb dark raisins
  • 2 lb light raisins
  • 2 lb red glace cherries
  • 2 lb green glace cherries
  • 2 lb glace mixed fruit
  • 1/2 lb mixed peel
  • 1 lb glace pineapple
  • 100 g slivered almonds


Method

1. Cut cherries in half and mix the raisins, fruit and nuts together in a large bowl with 4 cups of the flour and let sit overnight.

2. Butter and lightly flour pans. I borrow my Grandma’s vintage pans that belonged to her Grandma. They are square pans (4, 6, 8 and 9 inches) with removable bottoms and the full recipe uses all four of them. You can find them online and in stores by searching for cheesecake pans. You could also easily use a spring form pan, just as long as your pan is deep and has a removable bottom.


3. Cream butter and sugar. Add eggs one at a time and mix well. In a separate bowl, mix remaining 2 cups flour, baking powder and salt together. Add alternately with orange juice to the butter mixture.

4. Add some fruit and some batter to a large bowl or roasting pan. Mix. Keep adding some fruit and batter and mixing until they are all combined. Stir for a long time, even if it looks mixed – you need to get all the flour that was on the fruit combined. Mixing this much fruit is hard work and your arms will get tired. Take a small break but go back to mixing! If you make a full recipe you may want to make two half batches and mix them together at the end. I took pictures of what the batter looks like when it’s just barely mixed and when the mixing is finished.

As you can see from the second picture, the batter looks different after it’s been mixed long enough. It gets to be more of a thicker and smoother cake batter.


5. Transfer batter and fruit mixture to prepared removable bottom pans. Fill 2/3 full. Press the mixture into the corners and spread evenly. Scrape out any leftover batter from your mixing bowl (or turkey roaster as the case may be with a big batch) and spread thinly over top of the fruit already in the pans. This gives a bit of extra batter on top to protect the fruit while baking the cakes, as you can see from the following picture:


6. Bake at 275’F for 1 hour and then reduce heat to 250F and bake for 2 hours more or until done. A large cake takes about 3 hours total, whereas the smallest pan takes about 1.5 hours in total. Test with a cake tester and when it comes out clean the cake is done.

7. When cool flip them over onto parchment paper and press out of the pan. You may need to loosen the sides with a knife. Let them cool some more and then use a knife to loosen the bottom and take it off of the cake. When fully cooled wrap in plastic cling wrap and aluminum foil. The cakes can be frozen to be used at a later date as they freeze well. I had some leftover in my freezer from last year’s batch and they still tasted fresh.

Prepare to have your opinion of fruitcake changed for the better and enjoy!


Source: recipe so kindly provided by Julia Derksen